Shopify theme customization is one of the most common tasks when building or improving a Shopify store.You may want to change the layout of a product page, add a custom section, modify the cart, change typography, improve mobile responsiveness, or add custom functionality with Liquid, CSS, and JavaScript.
The difficult part is not making the change. The difficult part is making the change without breaking an existing Shopify store. A small Liquid error, an incorrectly edited JavaScript file, or a CSS rule that targets the wrong element can affect multiple pages across the storefront.
In this guide, I'll explain how to customize a Shopify theme safely, which files you should edit, how to work with sections and blocks, how to test changes before publishing, and the mistakes you should avoid when modifying a live store.
Why Shopify Theme Customization Needs a Careful Approach
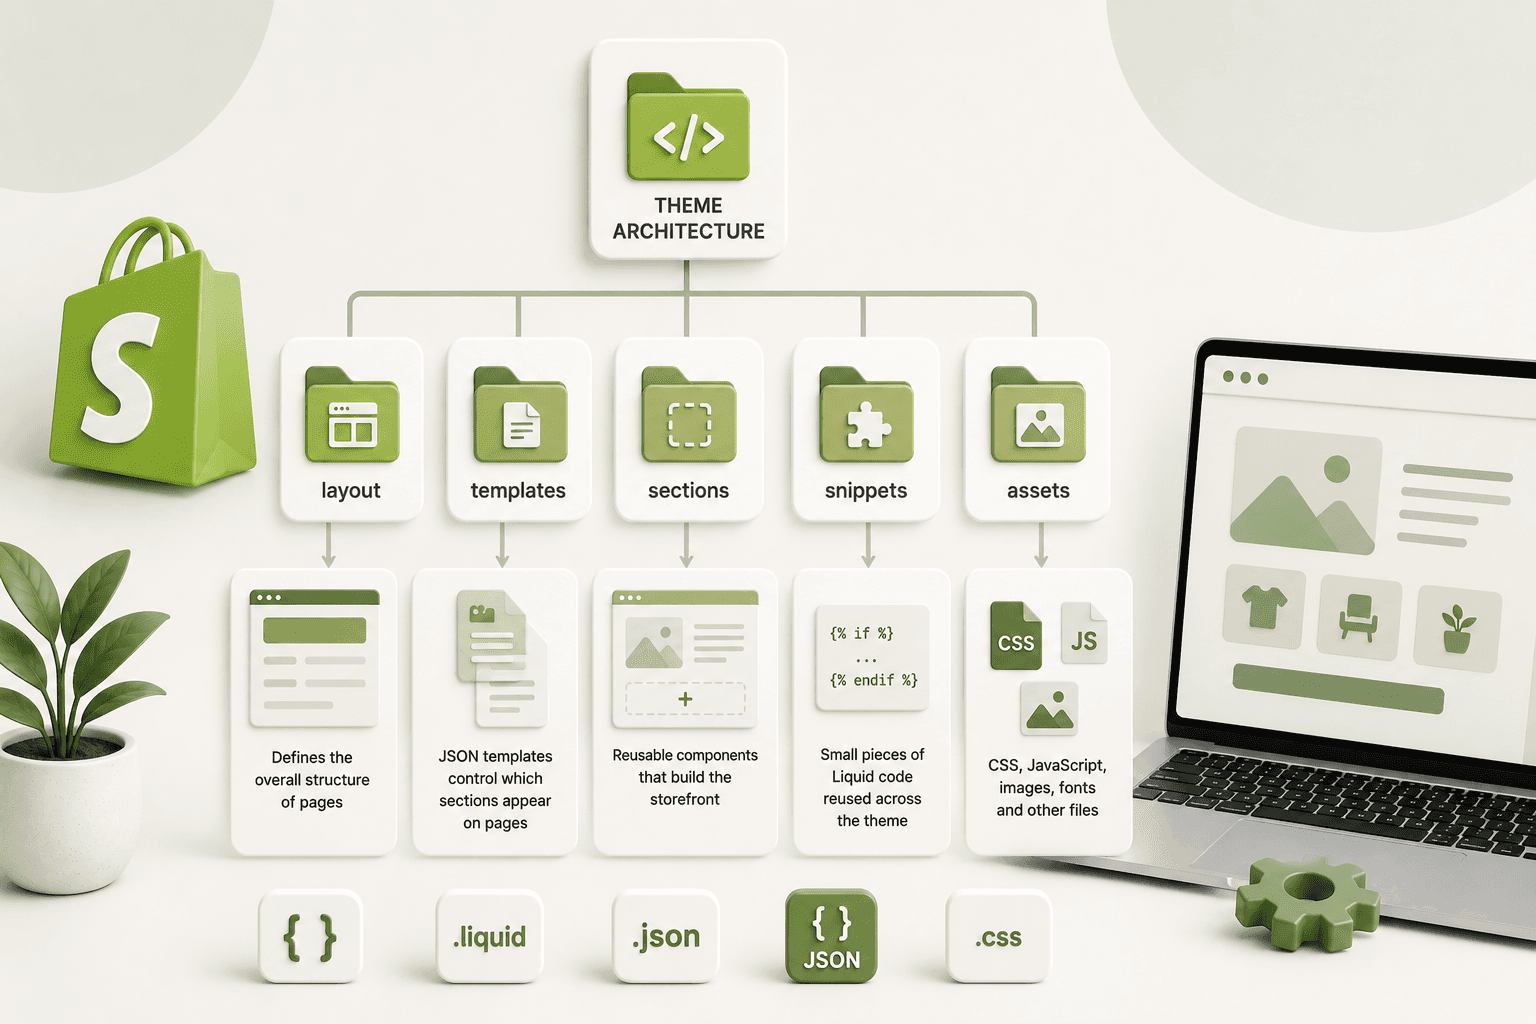
Shopify themes are made up of templates, sections, snippets, assets, configuration files, and Liquid code. These files work together to generate the storefront that visitors see.
This means that changing one file can sometimes affect several parts of your website. For example, editing a shared snippet may change the way that component appears on your product page, collection page, cart, or other templates.
Before changing anything, you should understand whether the file you're editing is used on one page or across the entire theme.
1. Always Create a Backup Before Making Changes
The first rule of safe Shopify theme customization is simple: never experiment directly on your live theme.
Before making major changes, duplicate your theme from the Shopify admin. This gives you a separate copy where you can safely test Liquid, CSS, JavaScript, sections, and templates.
A typical workflow looks like this:
- Open your Shopify admin.
- Go to the Themes section.
- Duplicate the current theme.
- Give the duplicate a clear development name.
- Make your changes inside the duplicate.
- Preview and test the theme.
- Publish it only after everything works correctly.
This simple habit can save you from accidentally taking down an important part of your storefront.
2. Understand the Shopify Theme Structure
Before customizing a Shopify theme, it helps to understand what the main directories are responsible for.
- layout/ — contains the main theme layout.
- templates/ — controls page-level structures and JSON templates.
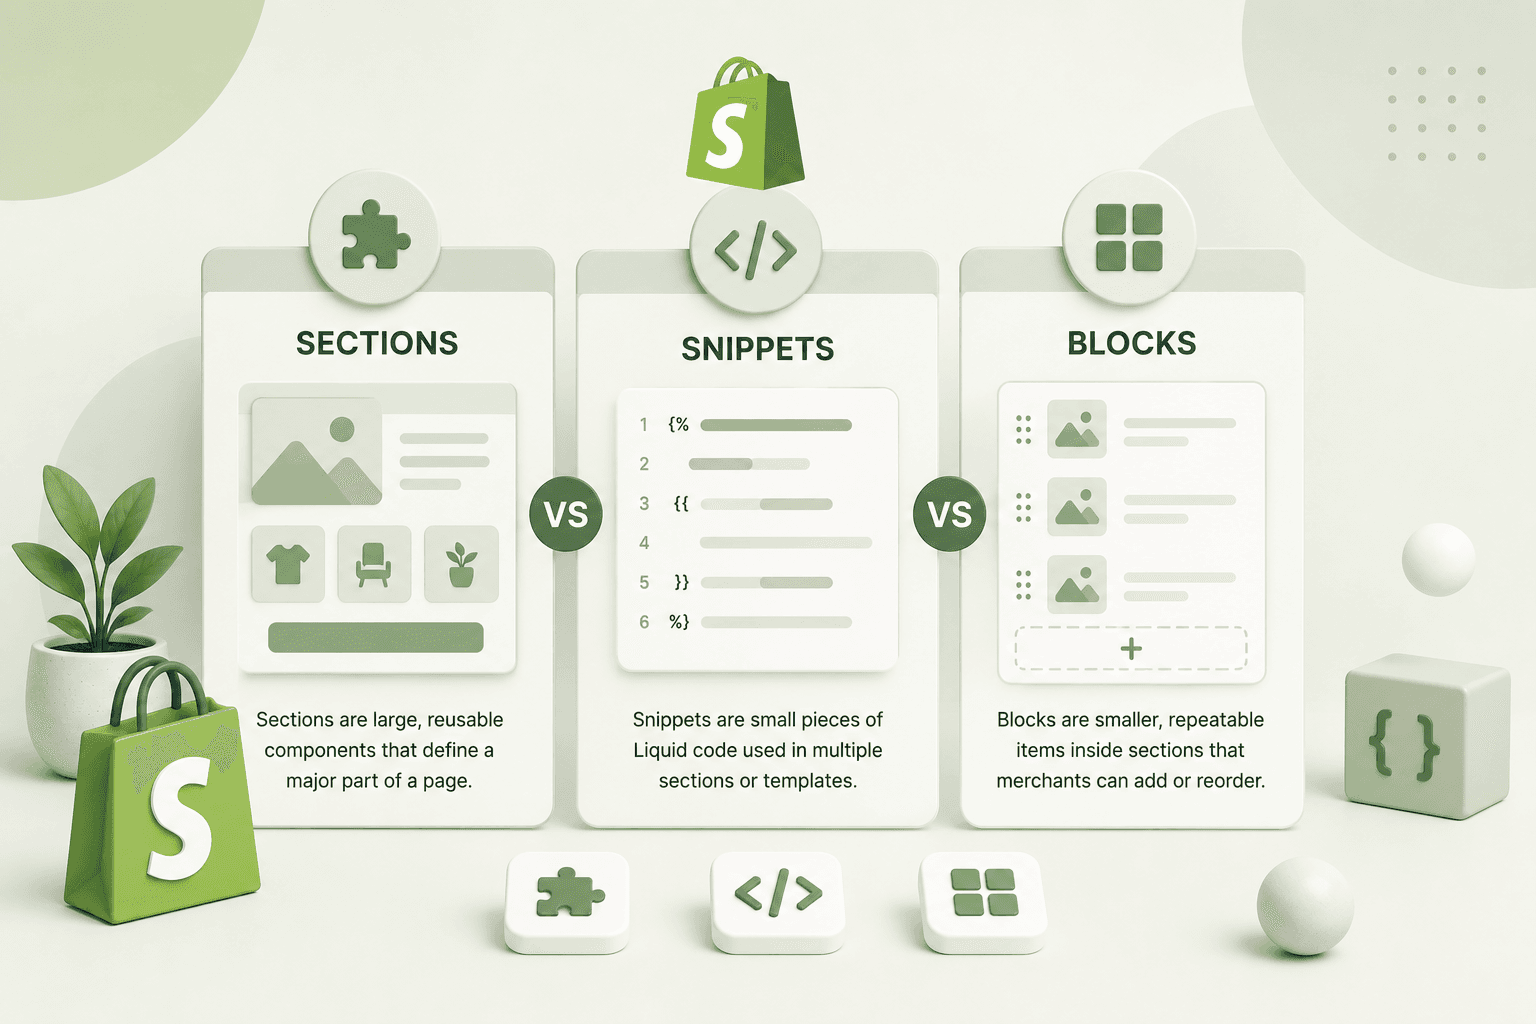
- sections/ — contains reusable sections that can be added to pages.
- snippets/ — contains smaller reusable Liquid components.
- assets/ — contains CSS, JavaScript, images, and other frontend assets.
- config/ — contains theme configuration and settings.
- locales/ — contains translation strings.
Understanding this structure helps you choose the correct place for a customization instead of adding everything to one large file.
3. Use Sections Instead of Editing Large Files
One of the best ways to keep a Shopify theme maintainable is to create reusable sections instead of continuously modifying existing theme files.
For example, if you need a custom promotional banner, you can create a dedicated section such as:
{% raw %}{% schema %}
    {
    "name": "Custom Promotional Banner",
    "settings": [
        {
        "type": "text",
        "id": "heading",
        "label": "Heading"
        },
        {
        "type": "text",
        "id": "text",
        "label": "Description"
        }
    ],
    "presets": [
        {
        "name": "Custom Promotional Banner"
        }
    ]
    }
    {% endschema %}{% endraw %}
Then your Liquid markup can use those settings:
{% raw %}{% endraw %}This approach makes the section configurable from the Shopify theme editor and reduces the need to hard-code content directly into the template.
4. Use Shopify Liquid Carefully
Liquid is one of the most important technologies you'll use when customizing a Shopify theme. It allows you to access products, collections, customers, metafields, settings, cart information, and other Shopify data.
A simple example is displaying a product metafield:
{% raw %}{% if product.metafields.custom.material != blank %}

            Material:
            {{ product.metafields.custom.material.value }}

    {% endif %}{% endraw %}
Notice the if condition. It prevents an empty element
from being rendered when the metafield does not contain a value.
When writing Liquid, always consider what happens when a product, collection, metafield, image, setting, or other value is empty.
5. Don't Hard-Code Everything
A common mistake when customizing Shopify themes is hard-coding content directly into Liquid files.
For example, instead of writing:
{% raw %}Free shipping on all orders
{% endraw %}it is often better to create a theme setting so the store owner can update the message from the Shopify theme editor.
{% raw %}{{ section.settings.heading }}
{% endraw %}This makes the customization more flexible and easier for a non-developer to maintain later.
6. Use Unique CSS Classes
CSS conflicts are another common reason why Shopify customizations break existing designs.
Avoid generic class names such as:
.title {
        color: red;
    }
A theme may already contain a class called .title.
Your new CSS could therefore affect unrelated elements.
Instead, use a unique component-specific naming pattern:
.bbs-custom-promo__title {
        color: #111844;
    }
Using unique classes makes custom sections easier to maintain and significantly reduces the chance of unexpected styling conflicts.
7. Make Every Customization Responsive
A Shopify customization is not finished when it looks good on a desktop screen. You also need to test it on mobile and tablet layouts.
This is especially important for:
- Hero banners
- Product galleries
- Navigation menus
- Custom sliders
- Product cards
- Tables
- Promotional sections
- Cart and drawer components
For example, a three-column desktop layout may need to become a single-column or two-column layout on smaller screens.
.bbs-products {
        display: grid;
        grid-template-columns: repeat(3, 1fr);
        gap: 24px;
    }

    @media (max-width: 749px) {
        .bbs-products {
            grid-template-columns: 1fr;
            gap: 16px;
        }
    }
Always check your customization using the browser's responsive device tools and, when possible, on an actual mobile device.
8. Be Careful When Editing JavaScript
JavaScript can add powerful functionality to a Shopify theme, but it can also create difficult-to-debug problems.
Before changing an existing JavaScript file, find out what functionality depends on it.
For example, a theme's JavaScript may control:
- Variant selection
- Cart drawer updates
- Product galleries
- Quick add functionality
- Modal windows
- Predictive search
- Mobile navigation
If you only need to add one small feature, avoid rewriting a large existing JavaScript module. A small, isolated component is usually safer and easier to test.
9. Be Careful With Theme App Extensions and Third-Party Apps
Shopify stores often use several third-party apps for reviews, subscriptions, upsells, tracking, search, product customization, and other features.
Before changing a theme component, check whether an app is using that component.
A customization that works perfectly on a clean development store may behave differently on a production store containing several third-party integrations.
If an app provides a theme app extension or an app block, prefer that integration method when appropriate instead of manually modifying the app's generated code.
10. Use Shopify's Theme Editor for Content Settings
Shopify's theme editor is useful because it allows store owners to manage content and layout without editing code every time.
When creating a custom section, think about which parts should be configurable:
- Heading
- Description
- Images
- Buttons
- Links
- Colors
- Spacing
- Alignment
You do not need to expose every CSS property as a setting. Only expose options that provide meaningful control to the store owner.
11. Test the Store Before Publishing
After completing a Shopify theme customization, don't immediately publish it.
Test the important customer journeys first.
Homepage
- Check navigation.
- Check hero sections.
- Check images.
- Check responsive layouts.
Product Page
- Test product variants.
- Test quantity controls.
- Test Add to Cart.
- Test product images.
- Test dynamic information and metafields.
Cart
- Add products.
- Remove products.
- Change quantities.
- Check cart drawer behavior.
- Continue to checkout.
Mobile
- Test navigation.
- Test buttons.
- Test horizontal scrolling.
- Check font sizes.
- Check image cropping.
- Check sticky elements.
12. Check the Browser Console
Open your browser's developer tools and check the Console after implementing custom JavaScript or third-party integrations.
Errors such as undefined variables, failed network requests, JavaScript exceptions, or blocked resources can reveal problems before your customers find them.
Also check the Network tab when working with AJAX requests, Shopify APIs, cart functionality, or third-party services.
13. Use Shopify CLI for More Advanced Development
If you're working on a larger Shopify theme project, using Shopify CLI can provide a much better development workflow than making every change manually inside the Shopify admin.
A local development workflow allows you to work with your code editor, Git, branches, and theme development tools while keeping your production theme safer.
For teams and professional development work, version control is especially useful because you can review changes, compare versions, and roll back code when necessary.
14. Keep Your Theme Changes Organized
As a Shopify store grows, theme files can become difficult to maintain if every customization is added without a consistent structure.
Use clear names for custom sections, snippets, CSS classes, and JavaScript modules.
For example:
sections/
        bbs-featured-products.liquid
        bbs-promo-banner.liquid
        bbs-testimonials.liquid

    snippets/
        bbs-product-badge.liquid

    assets/
        bbs-custom.css
        bbs-custom.js
A consistent naming convention makes it much easier to identify which code was added specifically for a project.
15. Common Shopify Theme Customization Mistakes
Here are some of the most common mistakes I would avoid when customizing a Shopify store.
- Editing the live theme without creating a backup.
- Changing shared snippets without checking where they are used.
- Using generic CSS selectors that conflict with the theme.
- Adding large amounts of unnecessary JavaScript.
- Ignoring mobile responsiveness.
- Hard-coding content that should be a theme setting.
- Removing existing functionality without checking dependencies.
- Installing unnecessary third-party apps for simple functionality.
- Publishing changes without testing checkout-related flows.
- Ignoring browser console errors.
Shopify Theme Customization: A Safer Workflow
If I were starting a new customization on an existing Shopify store, my workflow would look like this:
- Understand the requirement. Identify exactly what needs to change and which pages are affected.
- Inspect the existing theme. Find the relevant template, section, snippet, asset, or JavaScript module.
- Duplicate the theme. Never use the live theme as your experimental environment.
- Plan the implementation. Decide whether the change belongs in a section, snippet, template, CSS file, JavaScript file, or theme setting.
- Build the smallest change possible. Avoid modifying unrelated functionality.
- Test desktop and mobile. Check the actual user experience instead of only checking the code.
- Test important store functionality. Check products, variants, cart, navigation, search, and other features affected by the customization.
- Review performance and console errors. Remove unnecessary code and investigate errors before publishing.
- Publish only after testing. Keep the previous theme available as a fallback.
Frequently Asked Questions
Can I customize a Shopify theme without coding?
Yes. Shopify's theme editor allows many visual and content changes without writing code. However, more advanced customizations often require Liquid, HTML, CSS, JavaScript, or Shopify app development.
Can editing a Shopify theme break my store?
Yes. Incorrect Liquid, CSS, JavaScript, template changes, or third-party integrations can cause visual or functional problems. This is why you should develop on a duplicate or development theme and test before publishing.
Should I edit the live Shopify theme?
For significant customizations, I recommend working on a duplicate or development theme instead of directly editing the published theme. This gives you a safer environment for testing.
Is Shopify Liquid difficult to learn?
Liquid is relatively approachable once you understand its objects, tags, filters, conditions, loops, and Shopify-specific data structures. Learning Liquid is particularly useful for Shopify theme developers because it gives you much more control than the visual theme editor alone.
How can I make a Shopify theme mobile responsive?
Use responsive CSS, flexible layouts, appropriate image sizes, mobile-friendly typography, and breakpoint-specific styles. Always test custom sections on multiple viewport sizes before publishing.
Final Thoughts
Customizing a Shopify theme safely is less about making changes quickly and more about making controlled changes. A good Shopify developer understands how the existing theme works before modifying it.
Start with a backup or development theme, identify the correct file, keep custom code isolated, use sections and theme settings where appropriate, write unique CSS, test JavaScript carefully, and always check mobile responsiveness.
If you're working on a production Shopify store, the safest approach is to treat the theme like a real software project: make small changes, test them, keep your code organized, and maintain a reliable version that you can return to if something goes wrong.
That workflow not only reduces the risk of breaking your store, but also makes future Shopify theme customization faster and easier to maintain.